If you are looking for the OptinMonster Coupon Code 2024, then you’ve come to the right place! In this article, I’ll share how you can get the maximum discount on the OptinMonster.
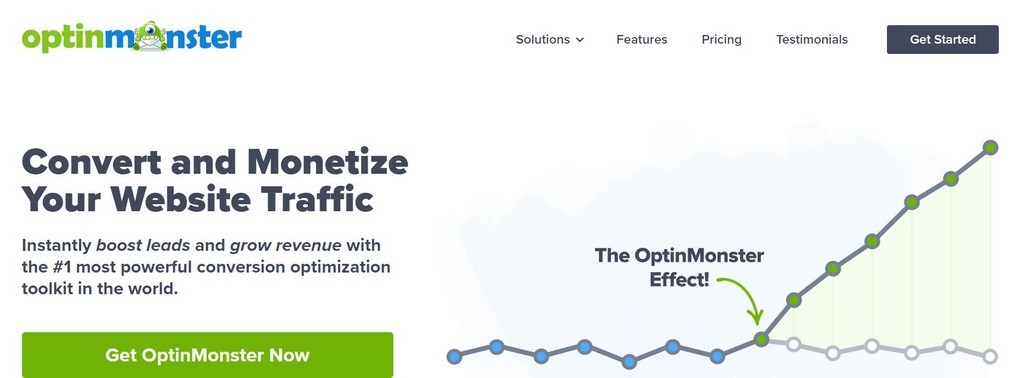
As you already know, OptinMonster is one of the world’s leading Lead Generation Tool that makes it great to collect leads.
Click Here To Get 50% OFF Optinmonster
OptinMonster Coupon Code 2024: AutoApplied
OptinMonster Coupon Code
Email marketing has been around for a long time and is still one of the most cost-effective ways of reaching your users and customers in 2021. For every $1 spent, email marketing generates around $38 usually which is an ROI that is simply unbeatable by other means of digital marketing.
So you might be wondering, how do I get started with email marketing? The first step to get started involves collecting subscribers for your email list. This is where lead generation tools like OptinMonster come into play.
You don’t want to just spam people with your emails because even though you can send your emails to a huge number of people, your emails will not reach the right people who are actually interested in your business.
With lead generation tools like OptinMonster, you can start collecting leads for your email list that are verified and interested in what you have to say.
In this in-depth OptinMonster review, I have broken down everything you need to know about OptinMonster and how it can bring value to your business.
Click Here To Get 50% OFF Optinmonster
OptinMonster Coupon Code 2024: AutoApplied
OptinMonster Discount Code
They’re many blogs making false claims of:
- OptinMonster Discount Code 2024
- OptinMonster Discount Code
- OptinMonster Discount
- OptinMonster Discount Coupon
- OptinMonster Coupon Code 2024
- OptinMonster Coupon Code
- OptinMonster Coupon
- OptinMonster Promo Code 2024
- OptinMonster Promo Code
- OptinMonster Promo
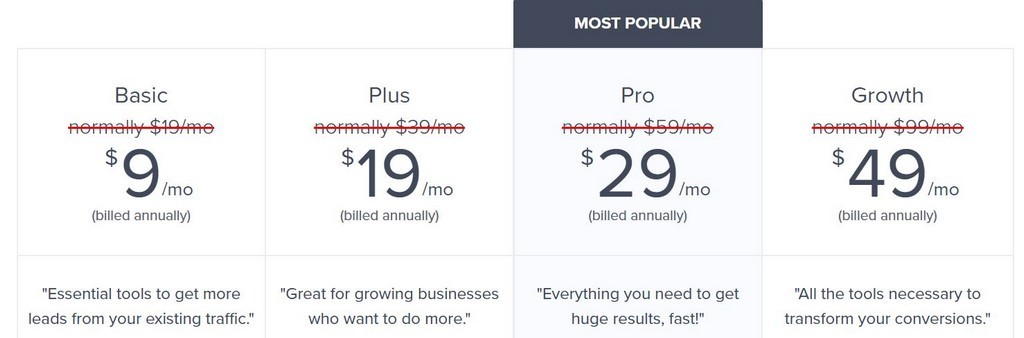
However, the truth is that OptinMonster does not offer any coupons! You can get a discount on OptinMonster if you decide to pay Annually instead of Monthly! If you decide to pay yearly instead of monthly you will save over 50%
OptinMonster Discount Price:
- Basic
$228$108 - Plus
$468$228 - Pro
$708$348 - Growth
$1188$588
JeremyNoronha.com readers can get a 50% Discount on OptinMonster. Simply click the link below and choose an annual plan (50% off included)
Hurry Up! Limited Time Offer.
If you need some help here’s a brief walkthrough on how to claim the discount:
Step 1: Go to OptinMonster by clicking here
Step 2: Choose a plan >> Get Started and proceed to sign up.
Step 3: Head to the Checkout page
That’s it!
OptinMonster Review
OptionMonster started as a premium WordPress opt-in plugin in 2013. The key features that helped OptinMonster to stand out from the competition were its user-friendly interface, impressive and clean form design, and triggers like exit intent.
At that time, the Exit Intent trigger was a pretty new feature that allowed you to trigger an opt-in form when the visitor on the webpage is about to leave the page. This was something new compared to the standard strategy of displaying opt-in forms right as the page loaded.
Some of the other features found in the early WordPress plugin included the ability to create multiple types of forms, many design templates, custom HTML and CSS, analytics and reporting, split testing, and integration with almost every major email marketing service.
The plugin essentially offered everything you would need when it comes to creating opt-in forms and it was widely successful. In fact, OptinMonster was so successful that it transformed from being a native WordPress plugin to an entirely self-hosted service that currently works with almost every major web platform.
Click Here To Get 50% OFF Optinmonster
OptinMonster Coupon Code 2024: AutoApplied
![]()
About OptinMonster
As stated above in this review, OptinMonster started off just as a WordPress plugin in 2013. However, since 2015, OptinMonster has adopted a SaaS model and works as a complete standalone lead generation tool with tons of advanced features.
This made a lot of sense as there are a number of benefits for using a SaaS over a WordPress plugin such as:
- You don’t have to install a huge resource-intensive plugin on your WordPress installation.
- You get access to more features and get a lot more flexibility.
- You can handle all the aspects of all your opt-in forms through one central dashboard in one location.
Other than transforming from a WordPress plugin to a full-fledged software, OptinMonster also added a lot of new and powerful features such as:
- Multiple more types of forms such as in-content, sidebar, full-screen, etc.
- More templates for forms.
- A brand new visual editor that makes creating full-screen pop-ups much easier and convenient.
- Ability to insert forms into pages and posts using code snippets.
- A Yes / No form option that allows you to ask your visitors a question and create a double opt-in form.
- Success templates that are shown after the visitors sign up.
- A pop-up trigger that detects adblockers.
- And many more!
Currently, you can create up to seven different types of opt-in forms using OptinMonster. Some of the popular types of forms include slide-in, inline, sidebar widget, floating bar, fullscreen and lightbox pop-up.
The inline and fullscreen opt-ins are particularly useful as they allow you to create a better user experience for your visitors.
For example, the fullscreen opt-in forms can be used to create a welcome message for your visitors or provide a distraction-free focused opt-in form as they’re leaving your site. All of the forms you create with OptinMonster are also mobile-friendly and responsive.
Other notable features include CSS3 animation effects that can be used to create a more lively opt-in form with animation and even sound effects that grab the visitor’s attention and increase the chances of conversion.
Lastly, the canvas editor allows you to create completely custom forms for your site. This means you can enter your own code to basically create any type of form you can think of.
This allows you to create a lot of unique forms and include all sorts of things such as your social media buttons, top products from your e-commerce store, and anything else you can think of.
Click Here To Get 50% OFF Optinmonster
OptinMonster Coupon Code 2024: AutoApplied
OptinMonster Features
Now that we have a basic idea of what OptinMonster is all about, let’s take a look at some of the most important features it has.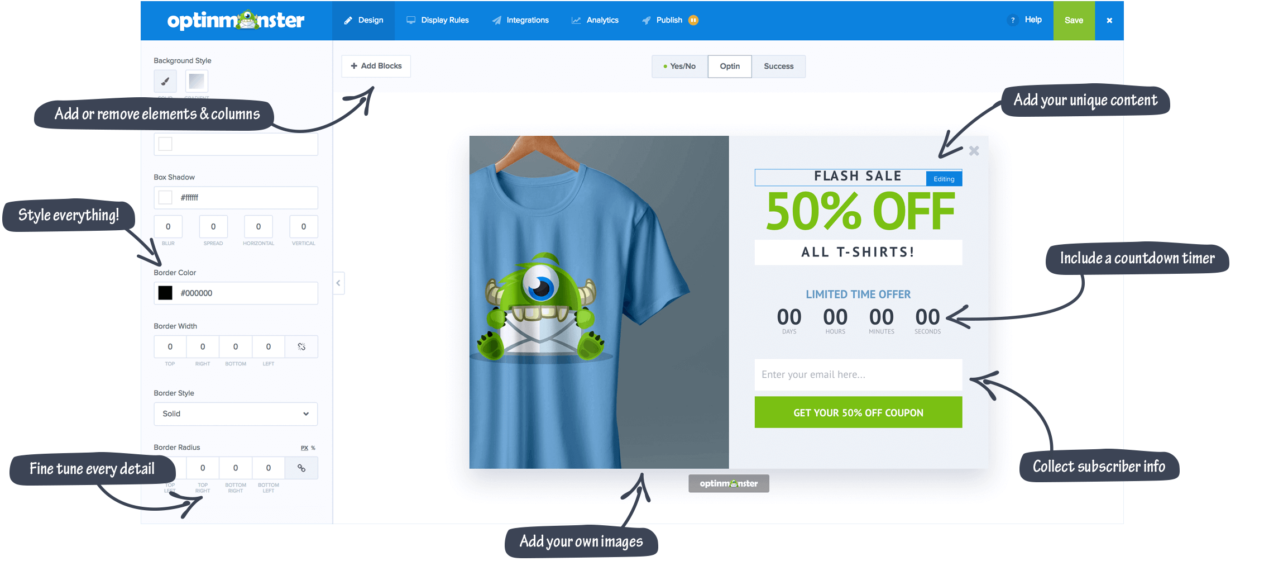
1. Form Types and Themes
There are 7 different types of forms that you can create with OptinMonster – lightbox popup, fullscreen, slide-in, floating bar, mobile popup, inline / after post, and sidebar.Once you have selected the type of opt-in form you want to create, you have the option of choosing from 94 different themes to use on the form.
However, there is a minor issue that can bother some people when it comes to selecting the themes. The themes are not represented by actual screenshots but by abstract graphics which can be a bit annoying.
2. Visual Editor
OptinMonster comes with a basic but streamlined visual editor that allows you to create custom opt-in forms for your website. With the visual editor, you can see exactly how your form would look and can edit most properties of the different elements of the form.
For example, you can customize different the look and feel of the fields and the buttons such as the font, text, foreground, borders, backgrounds, etc. However, the extent of customization that is available is decent but some might find it to be a bit basic when compared to the visual editor in LeadPages.
A limitation of the visual editor in OptinMonster is that you cannot add, or delete, or even rearrange the elements of the form template. This means that once you have selected a template, you are more or less forced to use the elements it comes with.
However, the visual editor still allows you to use custom CSS but it can be tricky to create custom CSS code if you’re not used to coding.
Lastly, OptinMonster also has a special visual editor called the Canvas editor which is basically a blank page that you can customize completely using HTML and CSS. However, the canvas editor is not real-time and can be a bit difficult to use.
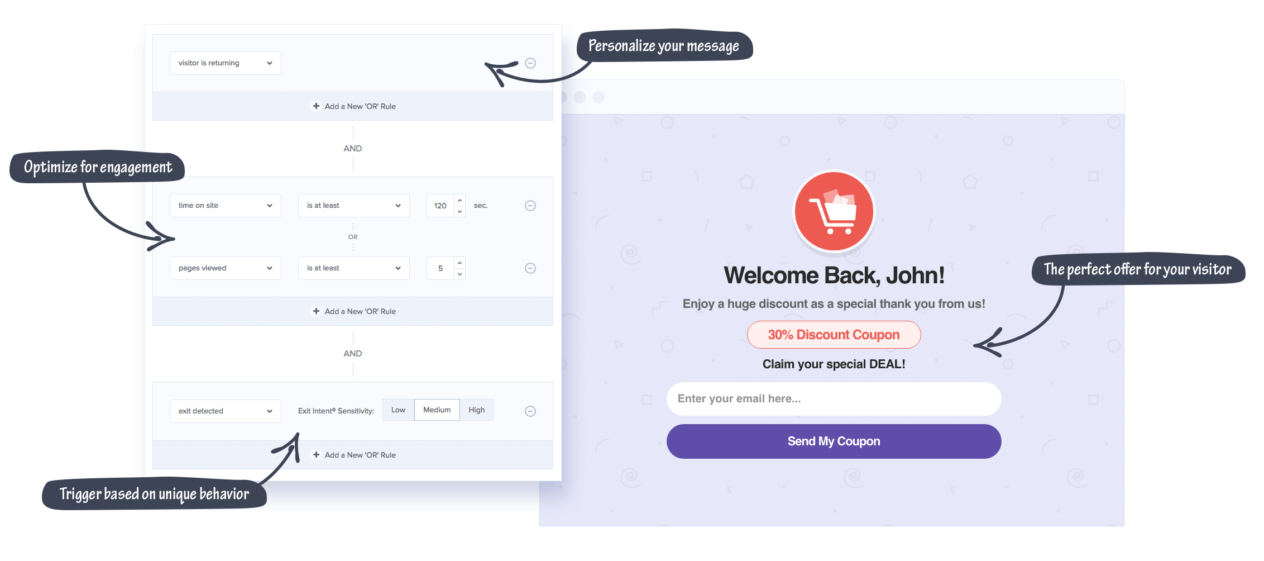
3. Targeting
OptinMonster has a great targeting system that dictates how your visitors will see your opt-in forms and where they will appear on your website. The targeting system works by creating rules for the form to follow.
There’s a lot of flexibility that is provided when it comes to setting targeting rules. The opt-in form you’re creating can be configured to show after the visitor has spent a certain amount of time on your website, when the visitor is leaving your website, when they click on a link, during a specific time or date, and on scrolling down a certain amount on the page.
What makes this targeting system really awesome is that not only can you use each rule individually but you can also combine the rules so they work together.
For example, you can set up an opt-in form that shows up after the visitor has spent 30 seconds on your website or you can set up an opt-in form that shows up after the visitor has spent 45 seconds on a page only on a specific date.
Overall, the number of options available when it comes to targeting can feel to be a bit overwhelming at first but it allows your opt-in forms to work exactly as you want and provides excellent targeting.
4. Split Testing
Split testing is one of the best ways to optimize your opt-in forms. The basic idea is simple – you create different versions of the same opt-in forms with some changes and see which one performs better. For example, you can split test different copy, colors, fonts, etc to see what really resonates with your visitors.
It is pretty easy to create split tests for your opt-in forms with OptinMonster. Once you have created a campaign, you can easily create different versions by clicking on the “More Options” button and then clicking on the “Create A/B split test” button.
You can name the different versions of your opt-in forms and add notes to the different tests so you can keep track of what exactly is different. The split tests are created using the same visual editor you use to create opt-in forms.
Once you’ve created a split test, it’ll appear on the main dashboard with the original opt-in form and you can track how well they’re performing against each other so you can create the most optimized version of your opt-in form and get the highest conversion rates for your campaigns.
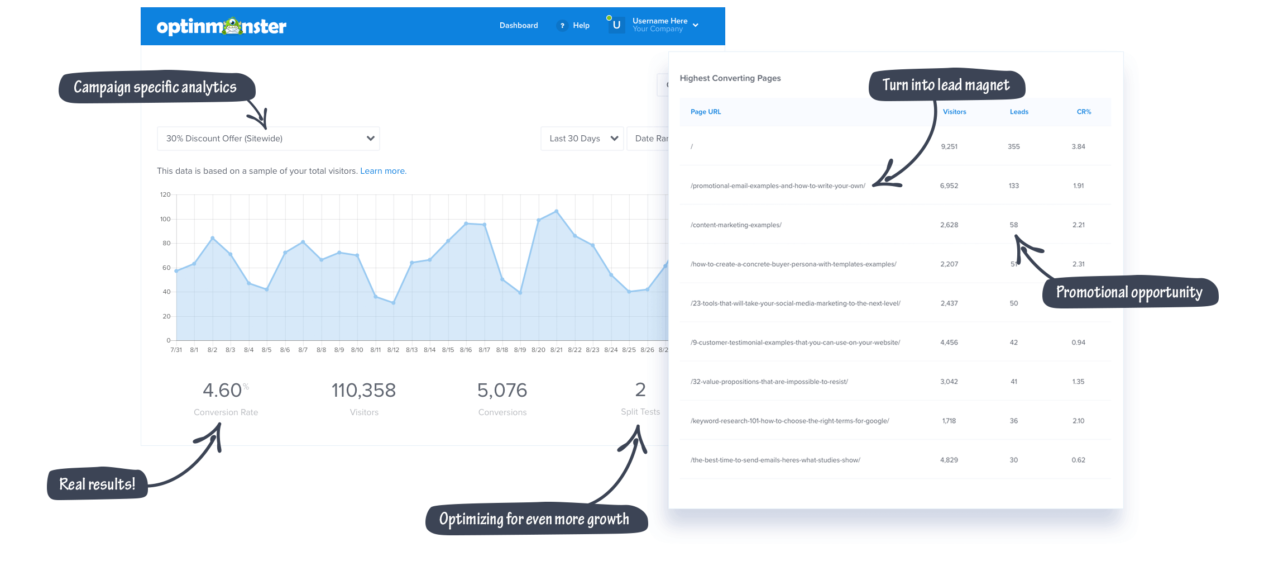
5. Analytics
It goes without saying that analytics is one of the most important parts of lead generation and digital marketing in general. You obviously want to track how your campaigns perform so you can ascertain how successful your strategy is.
OptinMonster provides data about all aspects of your campaigns including views, conversions, and conversion rates. The reporting capabilities are still pretty basic though but they provide a decent picture of the campaign’s performance.
However, one minor thing that you should know about analytics in OptinMonster is that you are stuck with using Google Analytics. It makes sense as OptinMonster is a Google Analytics partner and connects natively with the platform.
Usually, this should not be a problem as Google Analytics is free and also one of the best analytics platforms out there. In the off-chance that you don’t like using Google Analytics because you find it to be too complicated or too invasive for the visitors of your website, OptinMonster doesn’t provide you with a lot of other options.
Click Here To Get 50% OFF Optinmonster
OptinMonster Coupon Code 2024: AutoApplied
How to create an opt-in in OptinMonster
Now that you have a basic idea of what OptinMonster is and the features it comes with, let’s take a quick look through the process of creating a campaign using OptinMonster so you can get a practical walkthrough of how OptinMonster works.
1. Create a Campaign
Naturally, the first thing you would want to do with OptinMonster is to create a campaign, a term that is used for an opt-in form. You can create multiple campaigns for the same site or use them on different sites. All the campaigns can be managed from the OptinMonster dashboard.To get started with creating a campaign, you’ll have to click on the “Create Campaign” button. You’ll be redirected to a screen where you can select the type of form you want to create. This is basically where you choose what kind of opt-in form you want to create like popup, fullscreen, slide-in, etc.
Once you’ve selected the type of campaign you want, the next step is to choose a template for the campaign. You can find a number of ready-to-go templates for all types of campaigns so you can get your campaign up and running quickly. Alternatively, you can start from scratch by picking the “Canvas” template which is essentially a blank slate that you can customize.
After you’ve selected the type and template of the campaign, you have to give a name for the campaign and the website where the campaign will run. You can also leave the website field blank and fill it later if you want.
2. Design and configure your form
Once you’ve created the campaign, it’s time to design and edit the opt-in form so it’s ready to be published on your website.The OptinMonster editor provides a live display of the form you’re creating and has configuration options on the left. You can customize all parts of the form and it’s reflected live on the preview.
OptinMonster provides a number of different settings that allow you to customize how the form looks and functions. The settings are divided into different sections to make it easier to understand the context of the settings and find them quicker.
Some of the options include Cookie Duration under the “Display Settings” tab which allows you to set a time limit for how long a form stays hidden if the user closes it or submits it.
The “Optin” tab has most of the settings that let you configure how the opt-in would work for the user.
You can configure different things under the “Optin” tab such as customizing the fields, selecting the placeholder text, selecting different colors, adding custom CSS, etc. All of these settings are very easy to use and come with tools like color pickers that make the process visual and quick.
There is also an option to create a 2-step opt-in form found under the “Yes/No” tab. This allows you to configure your opt-in form in such a way that the visitor will have to answer a Yes / No question and the actual form is shown after the visitor clicks on “Yes”. You also have another tab called “Success” that lets you decide what happens after the visitor signs up.
As for how and when the opt-in form will appear on your website, you can configure all of that from the “Display Rules” tab. You can find settings in that tab that allows you to specify how the opt-in appears on your website, on what page it appears, and even to what kind of visitors the opt-in should appear.
There are a large number of different triggers you can select for your opt-in form to appear such as exit-intent, scroll-depth, click-, inactivity, date and time, etc. As for who sees your opt-in forms, you can set up targeting attributes such as page views, locations, referrer, on the detection of Adblock, etc.
An interesting thing to note here is that OptinMonster allows you to create different triggers and targeting attributes for the same campaign. This means you can reuse the same form on different pages of your website and set up different triggers and targeting rules for each page!
Lastly, you’ll find some integration and analytics options that will help you set up the campaign with your email marketing software and Google Analytics so you can track it.
3. Publish your opt-in form!
Once you’ve created your campaign, designed and configured it, you’re ready to publish it to a website. To publish your opt-in form, all you have to do is just click on the “Publish” button present on the top right corner.You’ll be redirected to a page where you can pick the website on which you want to publish the form. There are a number of options available when it comes to publishing the opt-in form and you have a lot of flexibility.
For example, you can either use a code snippet and add the opt-in form to any website directly or you can also use the dedicated OptinMonster plugin for WordPress to make the process much easier. Setting up the OptinMonster plugin on your WordPress installation is also very easy and is just a matter of a few clicks.
Once you’ve set up your WordPress plugin, you can manage any opt-in forms you create using OptinMonster and deploy them on your website with just a few clicks and your opt-in form will be published on your website.
4. Manage your campaign
Once your campaign is published on your website, the next step is to manage it and you can handle everything when it comes to the management of your campaign from the campaign management area provided in OptinMonster.You can easily find all the stats related to your campaign such as the conversion rate, visitors, conversions, etc. You can also create split tests in the campaign management area itself which allows you to optimize your campaigns.
One of the major advantages of OptinMonster transforming from just a plugin to a SaaS is that you can manage all your campaigns from one place which is really helpful if you’re running campaigns on more than just one website.
Click Here To Get 50% OFF Optinmonster
OptinMonster Coupon Code 2024: AutoApplied
OptinMonster Pricing
OptinMonster does not provide any free plans and instead offers four different paid plans that you can use. Here’s a quick breakdown of the different paid plans offered by OptinMonster:
1. Basic ($9 per month)
The Basic plan is the starter plan offered by OptinMonster at $9 per month. With the Basic plan, you can create unlimited campaigns and get access to features like list segmentation, basic integrations, simple reporting. However, you’re limited to 3,500 pageviews and only 1 site with the basic plan.
2. Plus ($19 per month)
The Plus plan offers everything that comes with the Basic plan. Additional features provided in the plan include split testing, advanced reporting, content locking, device targeting, animations, and sound effects, and more. The Plus plan supports up to 15,000 page views and 3 sites.
3. Pro ($29 per month)
The Pro plan comes with everything you get in the Plus plan with additional features like Exit Intent technology, mobile-specific campaigns, advanced integrations, yes / no forms, timers, campaign scheduling, cart and form abandonment forms too. Additionally, you also get 2 sub-accounts and the ability to remove the OptinMonster branding. The Pro plan can support up to 50,000 pageviews and can power 5 different sites.
4. Growth ($49 per month)
The Growth plan covers everything found in the Pro plan. It also provides the top-tier features of OptinMonster like Adblock detection, custom branding, behavior automation, activity logging, coupon wheel campaigns, and more! You can also create an unlimited number of sub-accounts. The growth plan also supports up to 250,000 page views and 10 sites.
As you can tell, there is a Plan for everyone. Right from 5000 page views to 250,000 page views, everyone can find a good plan for OptinMonster.
Basic
1 site
- Lightbox Popups
- Page Level Targeting
- List Segmentation
- Subscriber Recognition
- Success Messages
- Basic Integration
- Simple Reporting
- Branding Required
- OptinMonster University
- 5,000 Pageviews
- 3 Campaigns
$19/Month
Plus
2 sites
- Everything in Basic
- Floating Bars
- Inline Forms
- Content Locking
- Integrated A/B Testing
- Advanced Integrations
- Inactivity Sensor™
- Device Targeting
- MonsterEffects™
- MonsterSounds™
- Unlimited Campaigns
- 15,000 Pageviews
$39/Month
Pro
3 sites
- Everything in Plus
- Exit Intent® Technology
- MonsterLinks™
- Fullscreen Overlays
- Slide-in Scroll Boxes
- Pro Integrations
- Yes/No Forms
- Countdown Timers
- Campaign Scheduling
- UTM Targeting
- Referrer Detection
- Smart Tags™
- Attention Activation™
- Cart & Form Abandonment
- Remove Branding
- 2 Sub-Accounts
- Priority Support
- 50,000 Pageviews
$59/Month
Growth
5 sites
- Everything in Pro
- OnSite Retargeting
- Follow-up Campaigns
- Real-Time Personalization
- Coupon Wheel Campaigns
- Geolocation Targeting
- Success Scripts
- ManyChat Integration
- Adblock Detection
- Behavior Automation
- Custom Branding
- Activity Logging
- Advanced Reporting
- Unlimited Sub-Accounts
- 250,000 Pageviews
$99/Month
OptinMonster Customer Support
As OptinMonster is a SaaS and not a WordPress plugin, you get somewhat better customer support when compared to just WordPress plugins. However, customer support is still not that great and priority support is limited to higher-tier plans.
You can access customer support right from the dashboard itself. You can either get help by chat or by email. However, do note that customer support over chat is not available for all plans.
Regardless of the channel you use to get customer support, the response time is pretty decent and most issues are resolved fairly quickly.
OptinMonster Pros and Cons
Now that we’ve covered OptinMonster in-depth, let’s take a quick look at some of the pros and cons of the tool as a summary of the lead generation tool.
- It is very easy to use and has a user-friendly interface.
- You can create almost every type of opt-in form currently used and also get a lot of templates for all types.
- It integrates with almost every major email marketing tool.
- You can use lots of different triggers for your opt-in forms including exit intent.
- You can also split test your forms pretty easily.
- You can manage campaigns you create for different websites in one central dashboard.
- Being a complete SaaS platform, it can be more expensive than a lot of lead generation WordPress plugins.
- Split testing is not fully automatic and requires manual intervention.
- The visual editor is not a true drag-and-drop editor.
- You have to use Google Analytics to track the performance of the campaigns.
OptinMonster Alternatives
You might be wondering how OptinMonster compares against its competition. While it is one of the best lead generation tools in the market, there are some other options like LeadPages and ThriveLeads.
LeadPages isn’t just an opt-in form builder but instead is a landing page builder that also allows you to create opt-in forms too.
When compared to OptinMonster, LeadPages is more expensive but it has a much more flexible drag-and-drop builder. LeadPages also has fewer templates for opt-in forms than OptinMonster.
Also in terms of opt-in triggers, you also have much more flexibility with OptinMonster over LeadPages. So even though LeadPages might be a better solution for landing pages, OptinMonster can easily compete with it when it comes to just opt-in forms and can do so at a cheaper price.
ThriveLeads is another lead generation plugin that is pretty similar to OptinMonster and offers a similar set of features. In terms of targeting and display options, both OptinMonster and ThriveLeads are pretty similar too.
However, the main difference between the two is that ThriveLeads is still a WordPress plugin only and not a full-fledged software. The pricing is also much more complicated with ThriveLeads when compared to OptinMonster, especially if you’re just getting started with lead generation on your website.
Click Here To Try OptinMonster Now
Is OptinMonster worth it?
If you want to collect emails on your website, you don’t really have any other choice than using a lead generation tool to get the best conversion rates.
OptinMonster is a really solid lead generation tool and comes with many powerful features that help in building up your list easily and efficiently.
However, there are some minor problems with it that I would like to see rectified eventually such as the absence of a true drag-and-drop builder. It also has limited split testing capacity and there is no free trial available.
OptinMonster is also a cheaper choice when compared to solutions like LeadPages that are complete landing page builders.
If you want a cheap solution for lead generation that is focused only on making amazing opt-in forms and not full landing pages, OptinMonster is one of the best options out there currently in my opinion.
Click Here To Get 50% OFF Optinmonster
OptinMonster Coupon Code 2024: AutoApplied
Other Articles:
Leave a Reply